...
...
...
...
Remotion & Open Graph Video
What We’re Building
A good friend of mine, @yannispanagis, pointed me in the direction of remotion the other day. Remotion allows you to code videos using your ReactJS and CSS knowledge. It blew my mind. When I come across new tech like this, I always ask myself - How could I use this to do something interesting.
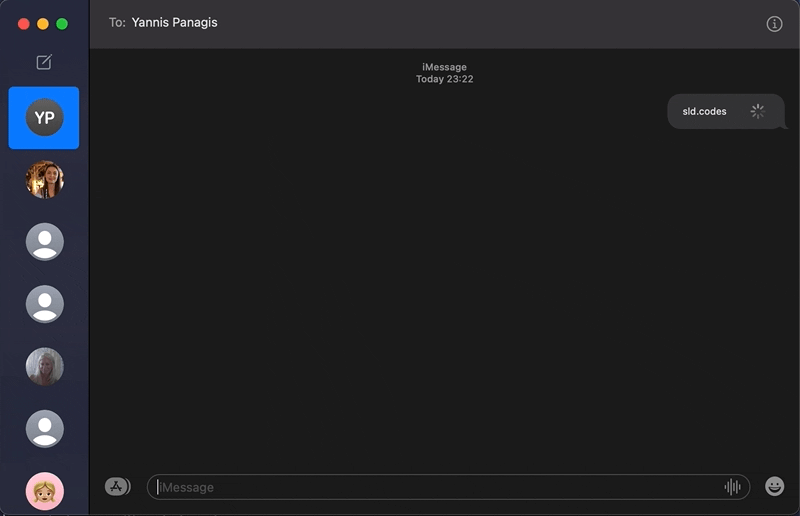
I was there thinking to myself that my personal site doesn’t need programmatic video, then I suddenly remembered that open graph was a thing. This is the journey of how I incorporated og:video into my gatsby site and ended up with video previews for (most of) my site like this:
What is Open Graph and og:video?
The Open Graph protocol enables any web page to become a rich object in a social graph. For instance, this is used on Facebook to allow any web page to have the same functionality as any other object on Facebook.
Open Graph allows us to create rich meta previews of our web pages. Whenever you share a website via iMessage, WhatsApp or Messenger and see a nice pretty image and description pop up - that’s Open Graph doing its thing. Anybody can add this information to their website by adding it to the head of their HTML.
Open Graph has some necessary metadata required to use the protocol, but there are also optional pieces of data you can add. Today we’re talking about one of those, particularly the og:video tag that allows you to supplement a URL to a video file that complements the page. Unfortunately, the og:video tag isn’t supported on every platform, and the only one I managed to get it to work on was iMessage, so keep that in mind when trying to test your solution.
Jumping into Remotion

Remotion has a really neat little starter repo that gives you a great overview of how the software works; if you haven’t checked it out, I highly encourage you to do that before reading on. Done that? Cool.
I wanted to build two different templates:
- The
PagePreview: A video of my digital self showing you a preview of the page that you’re about to visit. So meta. To create this, I will pass in the URL it needs to render. - The
ArticlePreview: A video with animated text that has a bouncy title followed by an overview of the article using the tags.
import { Composition } from "remotion";
import { Article } from "./Article";
import { Page } from "./Page";
export const RemotionVideo: React.FC = () => {
  return (
    <>
      <Composition
        id="Article"
        component={Article}
        durationInFrames={150}
        fps={30}
        width={1200}
        height={628}
        defaultProps={{
          title: "Site Rebuild",
          tags: "An article about UX, ReactJS & Gatsby",
        }}
      />
      <Composition
        id="Page"
        component={Page}
        durationInFrames={150}
        fps={30}
        width={1200}
        height={628}
        defaultProps={{
          url: "https://sld.codes/stats",
        }}
      />
    </>
  );
};
Why 1200x628? Because the recommended og:image size is 1200x627, but remotion failed when I gave it an odd height, so I added an extra pixel.
The Page Preview
import {
  interpolate,
  Sequence,
  useCurrentFrame,
  useVideoConfig,
} from "remotion";
import { Logo } from "./HelloWorld/Logo";
import { SitePreview } from "./HelloWorld/SitePreview";

export const Page: React.FC<{
  url: string;
}> = ({ url }) => {
  const frame = useCurrentFrame();
  const videoConfig = useVideoConfig();

  return (
    <div style={{ flex: 1, backgroundColor: "#243055" }}>
        <Sequence from={0} durationInFrames={videoConfig.durationInFrames}>
          <Logo
            endPosX={660}
            endPosY={180}
          />
        </Sequence>
        <Sequence from={transitionStart + 10} durationInFrames={Infinity}>
          <SitePreview url={url} />
        </Sequence>
    </div>
  );
};
The Logo component I made reusable as I intended to use it across both videos:
import {interpolate, spring, useCurrentFrame, useVideoConfig, Img} from 'remotion';
import Floats from './Floats.png';
import "./hover.css"

export const Logo: React.FC<{
	endPosX: number;
	endPosY: number;
}> = ({endPosX=600, endPosY=100, small=false}) => {
	const videoConfig = useVideoConfig();
	const frame = useCurrentFrame();

	const rotationDevelopment = spring({
		config: {
			damping: 100,
			mass: 0.5,
		},
		fps: videoConfig.fps,
		frame,
	});

	const scaleIn = spring({
		frame,
		config: {
			mass: 0.5,
		},
		fps: videoConfig.fps,
	});

	const translation = interpolate(
		spring({
			frame: frame - transitionStart,
			fps: videoConfig.fps,
			config: {
				damping: 100,
				mass: 0.5,
			},
		}),
		[0, 1],
		[0, endPosY]
	);
	const translationX = interpolate(
		spring({
			frame: frame - transitionStart,
			fps: videoConfig.fps,
			config: {
				damping: 100,
				mass: 0.5,
			},
		}),
		[0, 1],
		[0, endPosX]
	);

	const scale = frame < 50 ? scaleIn : 1;


	return (
		<div
			style={{
				position: 'absolute',
				zIndex: 50,
				width: videoConfig.width,
				height: videoConfig.height,
				transform: `scale(${scale}) translateY(${translation}px) translateX(${translationX}px)`,
			}}
		>
			<div style={{position: 'relative'}}>
			<Img src={Floats} className="hidden md:block float-y" style={{
				position:'absolute',
				top:0,
				left:0,
				zIndex:30,
			}}/>
			<div
				style={{
					position:'absolute',
					top:90,
					left:160,
					zIndex:10,
					backgroundColor: '#f5bf37',
					borderRadius: '50%',
					width: 350,
					height: 350,
				}}
			/>
		</div>
		</div>
	);
};
As you can hopefully see in the code above the Logo component scales in and also transforms the X and Y position of the img.
The SitePreview Component makes use of the remotion Iframe:
import {IFrame, spring, useCurrentFrame, useVideoConfig} from 'remotion';
import './hover.css';

export const SitePreview: React.FC<{
	url: string;
}> = ({url}) => {
	const frame = useCurrentFrame();
	const config = useVideoConfig();
	const prettyURL = url.replace(/(^\w+:|^)\/\//, '');
	const path = prettyURL.replace('sld.codes', '');
	const scaleIn = spring({
		frame,
		config: {
			mass: 0.5,
		},
		fps: config.fps,
	});

	const scale = frame < 50 ? scaleIn : 1;

	return (
		<div
			style={{
				position: 'relative',
				zIndex: 1,
				transform: `scale(${scale})`,
			}}
		>
			<div
				style={{
					position: 'absolute',
					top: 30,
					left: 30,
					width: 800,
					zIndex: 1,
					height: 800,
				}}
			>
				<div
					style={{
						fontFamily: 'SF Pro Text, Helvetica, Arial',
						position: 'relative',
						backgroundColor: '#0C101D',
						border: '15px solid #0C101D',
						paddingTop: 0,
						borderRadius: 10,
						width: '100%',
						height: '100%',
					}}
				>
					<div
						style={{
							position: 'absolute',
							color: 'white',
							top: -75,
							right: -350,
							width: 300,
						}}
					>
						<h3 style={{fontSize: 60, marginBottom: 0, fontWeight: 'normal'}}>
							<span style={{color: '#f5bf37', fontWeight: 'bold'}}>
								sld.codes
							</span>
						</h3>
						<h3
							style={{
								fontSize: path.length > 10 ? 30 : 60,
								marginTop: 0,
								fontWeight: 'normal',
							}}
						>
							{path}
						</h3>
					</div>
					<div
						style={{
							marginBottom: 8,
							display: 'flex',
							justifyContent: 'flex-end',
						}}
					>
						<div
							style={{
								height: 15,
								width: 15,
								borderRadius: '50%',
								backgroundColor: '#EF4444',
								marginRight: 5,
							}}
						/>
						<div
							style={{
								height: 15,
								width: 15,
								borderRadius: '50%',
								backgroundColor: '#F59E0B',
								marginRight: 5,
							}}
						/>
						<div
							style={{
								height: 15,
								width: 15,
								borderRadius: '50%',
								backgroundColor: '#10B981',
							}}
						/>
					</div>
					<IFrame
						src={url}
						frameBorder="0"
						style={{width: '100%', height: '100%'}}
					/>
				</div>
			</div>
		</div>
	);
};
I’ve wrapped the Iframe in a styled div to make it look like a browser window. The component also scales in much like the Logo component.
The Article Preview
import {interpolate, Sequence, useCurrentFrame, useVideoConfig} from 'remotion';
import {Logo} from './HelloWorld/Logo';
import {Subtitle} from './HelloWorld/Subtitle';
import {Title} from './HelloWorld/Title';

export const Article: React.FC<{
	title: string;
	tags: string;
}> = ({title, tags}) => {
	const frame = useCurrentFrame();
	const videoConfig = useVideoConfig();

	const opacity = interpolate(
		frame,
		[videoConfig.durationInFrames - 25, videoConfig.durationInFrames - 15],
		[1, 0],
		{
			extrapolateLeft: 'clamp',
			extrapolateRight: 'clamp',
		}
	);
	const transitionStart = 25;

	return (
		<div style={{flex: 1, backgroundColor: '#243055'}}>
			<div style={{opacity}}>
				<Sequence from={0} durationInFrames={videoConfig.durationInFrames}>
					<Logo transitionStart={transitionStart} />
				</Sequence>
				<Sequence from={transitionStart + 10} durationInFrames={Infinity}>
					<Title titleText={title} />
				</Sequence>
				<Sequence from={transitionStart + 30} durationInFrames={Infinity}>
					<Subtitle subtitle={tags}/>
				</Sequence>
			</div>
		</div>
	);
};
The Article component makes use of the same Logo component.
Both the Title and Subtitle component have a similar structure that looks like this:
import {spring, useCurrentFrame, useVideoConfig} from 'remotion';

export const Title: React.FC<{
	titleText: string;
}> = ({titleText}) => {
	const videoConfig = useVideoConfig();
	const frame = useCurrentFrame();
	const text = titleText.split(' ').map((t) => ` ${t} `);
	return (
		<h1
			style={{
				fontFamily: 'SF Pro Text, Helvetica, Arial',
				fontWeight: 'bold',
				fontSize: titleText.length > 20 ? 60: 100,
				textAlign: 'left',
				position: 'absolute',
				top: 10,
				left:50,
				width: '100%',
			}}
		>
			{text.map((t, i) => {
				return (
					<span
						key={t}
						style={{
							color: "white",
							marginLeft: 10,
							marginRight: 10,
							transform: `scale(${spring({
								fps: videoConfig.fps,
								frame: frame - i * 5,
								config: {
									damping: 100,
									stiffness: 200,
									mass: 0.5,
								},
							})})`,
							display: 'inline-block',
						}}
					>
						{t}
					</span>
				);
			})}
		</h1>
	);
};
The scale transform is what gives it it’s bouncy appearance in the video.
Remotion + Gatsby

The Gotcha
While playing with this on my localhost, I noticed one potential “gotcha”. To use remotion, you need to have FFMPEG installed as a dependency on the machine - If you’re building and deploying all locally, this is not a problem but a lot of people out there (myself included!) use tools like Gatsby Cloud to build their sites. There is no guarantee that the machine your build runs on has FFMPEG installed.
This put me off the conventional “gatsby-plugin-” route. I instead decided that I would create a script that would create the videos locally and commit them to the repo. I know a few of you will wince as your read that. But there are two things to bear in mind:
- I don’t create a video for absolutely every single route on the site. That would be around 300 files and counting.
- The video size was actually surprisingly small, around 800kb to 1mb per video. I can live with this.
Getting the Page Data from Gatsby
Not using Gatsby? No worries! As you will see in this step, all we want to do is end up with a JSON file we can use with remotion. If you can get something that looks similar, you should be good to continue on to the next step.
I figured I would create some kind of video manifest that I could use to generate videos. A JSON file with the bits of information I need on each page. There is no better time to collect this data then when I am programmatically creating pages in gatsby-node.js:
exports.createPages = async ({ actions, graphql, reporter }) => {
  const { createPage, createRedirect } = actions;
  let videoManifest = [];

  const mdxPosts = await graphql(`
    {
      allMdx {
        edges {
          node {
            frontmatter {
              title
              tags
            }
          }
        }
      }
    }
  `);

  mdxPosts.data.allMdx.edges.forEach((item, index) => {
    const slug = "/articles/" + formatTitleForURL(item.node.frontmatter.title);

    // Create our page like normal
    createPage({
      myPageData
    });

    // Also push this article to the video manifest
    videoManifest.push({
      type: "Article",
      path: slug,
      url: functionFullURL(slug),
      title: item.node.frontmatter.title,
      tags:
        "An article about " +
        item.node.frontmatter.tags
          .map(
            (tag, i) =>
              `${tag}${item.node.frontmatter.tags.length - i > 2 ? ", " : ""}${
                item.node.frontmatter.tags.length - 2 === i ? " & " : ""
              }`
          )
          .join(""),
    });
  });

	// Write this data to my remotion folder when we're done.
  const jsonString = JSON.stringify(videoManifest);
  fs.writeFile("./remotion/manifest.json", jsonString, (err) => {
    if (err) {
      console.log("Error!", err);
    } else {
      console.log("Wrote video manifest!");
    }
  });
};
So the output of this is a manifest.json that looks a little something like this:
[
  {
    "type": "Article",
    "path": "/articles/Gimme-Git-Quick",
    "url": "https://sld.codes/articles/Gimme-Git-Quick",
    "title": "Gimme Git Quick",
    "tags": "An article about git"
  },
  {
    "type": "Article",
    "path": "/articles/Sams-Hackathon-Survival-Guide",
    "url": "https://sld.codes/articles/Sams-Hackathon-Survival-Guide",
    "title": "Sam's Hackathon Survival Guide",
    "tags": "An article about hackathon, guide & ux"
  }
]
Creating The Script
Remotion docs have a really neat section on using the tool with Server-Side Rendering that includes a section on rendering a video programmatically for use on a node server. This is actually super easy to modify to our use case, we just source our data from a local json file instead of via API request.
const fs = require("fs");
const nodePath = require("path");
const os = require("os");
const { bundle } = require("@remotion/bundler");
const {
  getCompositions,
  renderFrames,
  stitchFramesToVideo,
} = require("@remotion/renderer");
const replaceAll = require("replaceall");

// Import our manifest
const manifest = require("./manifest.json");

let bundled;
let comps;

// This is our prep step
const prep = async () => {
  // Create a webpack bundle of the entry file.
  bundled = await bundle(require.resolve("./src/index.tsx"));
  // Extract all the compositions you have defined in your project
  // from the webpack bundle.
  comps = await getCompositions(bundled);
};

// funciton to create the video
const generateVideo = async ({ type, path, ...otherProps }) => {
	// Create a file name from the path location
  let actualpath =
    path.charAt(0) !== "/"
      ? replaceAll("/", "-", path)
      : replaceAll("/", "-", path).substring(1);

  // The composition you want to render
  const compositionId = type;

  // Select the composition you want to render.
  const video = comps.find((c) => c.id === compositionId);

  // We create a temporary directory for storing the frames
  const framesDir = await fs.promises.mkdtemp(
    nodePath.join(os.tmpdir(), "remotion-")
  );

  // We create JPEGs for all frames
  await renderFrames({
    config: video,
    webpackBundle: bundled,
    onStart: () => console.log("Rendering frames..."),
    onFrameUpdate: () => {},
    parallelism: null,
    outputDir: framesDir,
    // React props passed to the root component of the sequence.
    userProps: otherProps,
    compositionId,
    // Can be either 'jpeg' or 'png'. JPEG is faster, but has no transparency.
    imageFormat: "jpeg",
  });

	// Grab a frame we can use for og:image fallback
  fs.renameSync(
      nodePath.join(framesDir, "element-100.jpeg"),
      nodePath.join(__dirname, "..", "/static/covers", `${actualpath}.jpeg`)
   );

  // Make an MP4 out of the rendered frames.
	// Turns the path into a video file name
  await stitchFramesToVideo({
    // Input directory of the frames
    dir: framesDir,
    // Overwrite existing video
    force: true,
    // Possible overwrite of video metadata,
    // we suggest to just fill in the data from the
    // video variable
    fps: video.fps,
    height: video.height,
    width: video.width,
    // Must match the value above for the image format
    imageFormat: "jpeg",
    // Output the video to our gatsby static folder.
    outputLocation: nodePath.join(__dirname, '..', '/static/video', `${actualpath}.mp4`),
  });
  return;
};

// Our Start function
async function start() {
	// Before running, use our prep function.
  await prep();
  // Loop through our manifest
  for (const item of manifest) {
    console.log("Creating Video for " + item.path);
    await generateVideo(item);
  }
}

// Trigger the thing!
start().then(() => {
  process.exit(0);
});
So lets just run through what this script is doing in plain English, the script:
- Iterates through our manifest.
- Uses the manifest item type to determine the type of video to generate.
- Passes props from the manifest to the video components.
- Creates a png sequence of the component.
- Saves a frame, in my case the 100th, to use as an
og:imagein caseog:videois not supported by the platform. - Turns the png sequence into an mp4 video.
- Writes that video to our gatsby static folder.
If you are not already aware, Gatsby copies the contents of your static folder into your public folder at build time so you can access the resources.
Hooking up to the SEO Component
The last step is to reference the video in our SEO component. I use the same SEO component across multiple pages of my site. Any page that has a video, I pass it in as props when using the component:
 <SEO
        keywords={[`Sam`, `Larsen-Disney`, `About`, `Me`]}
        title="About Me"
        socialcard={"social-card-about"}
        video="about.mp4"
 />
Lets take a deeper look into my SEO component:
import { useStaticQuery, graphql } from "gatsby";
import PropTypes from "prop-types";
import React from "react";
import { Helmet } from "react-helmet-async";

function SEO({ video, ...allMyOtherMetaTags }) {
  return (
    <>
      <Helmet
        meta={[
          ...(video
            ? [
                {
                  property: `og:video`,
                  content: `/video/${video}`,
                },
                {
                  property: `og:video:type`,
                  content: "video/mp4",
                },
                {
                  property: `og:video:width`,
                  content: "1200",
                },
                {
                  property: `og:video:height`,
                  content: "628",
                },
              ]
            : []),
         ...allMyOtherMetaTags
        ].concat(meta)}
      />
    </>
  );
}
Theres some meta tags here that we haven’t talked about yet, lets take a look:
og:video:type: defines the type of the video. If you’re intending to see this in action on iMessage, make sure this is set tovideo/mp4og:video:width&og:video:height: definedsthe size of the video, be sure these match your remotion output.
Deploy, Preview & Next Steps

Theres nothing left to do but deploy your application and check it works! The next steps are turning this into a gatsby-plugin. I’m going to reach out to gatsby cloud first though and see if I can get FFMPEG installed on their machines.
I hope you enjoyed this article, if you want to know when I release new content, considering signing up to my newsletter.
...
...
...
...


Join My Newsletter
Want to know when I post something new? For the latest articles and projects straight to your inbox, subscribe to my newsletter.